Author: suji2019
Setting up WhatsApp Telegram Bridge
- First, create a Telegram bot by using @botfather. i.e. send /newsbot command to @botfather and then the botfather bot will give you a token numberBotfather
- Clone the wat-bridge repository at https://github.com/rmed/wat-bridge.git.
git clone https://github.com/rmed/wat-bridge.git- Enter the cloned directory
cd wat-bridge- Setup python virtual environment
virtualenv -p python3 venv . venv/bin/activate- Install the required packages from requirements.txt
pip install -r requirements.txt- Install latest yowsup
git clone https://github.com/tgalal/yowsup.git cd yowsup # Install dependencies to build yowsup sudo apt-get install ncurses-dev python3-dev python setup.py install
Registering a number with yowsup
Now that we have installed yowsup, let’s register a phone number using yowsup.
NB: This number may get banned by WhatsApp, so use at your own risk! Also, don’t use your primary WhatsApp number for this, use a number which isn’t registered with WhatsApp yet.
Register a number
yowsup-cli registration --request sms --phone 49XXXXXXXX --cc 49 --mcc 123 --mnc 456- Provide phone number, CC, MCC & MCN. CC is the Country pre, you can know more about MCC and MNC from here. Now you will get an OTP to your number. Use that OTP in the next step for registration.
yowsup-cli registration --register 123456 --phone 49XXXXXXXX --cc 49- Now you will receive a password. Store this password anywhere securely.
- Now let’s go to wat-bridge directory. Copy development.conf into another file
cp development.conf config.conf- Open config.conf in any text editor and change the parameters
[tg] owner = ONWER_ID - this is the bot creatorID token = TOKEN - Token got from @botfather- (WA) phone = PHONE_NUMBER – registred phone number password = PASSWORD – password obtained from yowsup registration
- (DATABASE) path = PATH_TO_DB – create a .db file in wat-bridge folder and give its path
WAT_CONF=config.conf python watbridge.py
Yes, you are done! The bridge will be running now.
Bridge WhatsApp and Telegram groups
- Add the Whatsapp number to required WhatsApp group and send any message
- Add telegram bot in required telegram group send /me and copy the message get from bot
- Go to your bot now you will get a message from the added Whatsapp group with a number in it (that number is WhatsApp group id)
/add  <group name> <that number from  step3>

/bind <group name> <number get from 2 step>
Now both groups are linked.

Binding groups
Bridge WhatsApp and Telegram groups using forked bot
- Add the WhatsApp number to required WhatsApp group and send /getID
- Now you will receive a message with random numbers starting with /link, copy that entire message
- Add Telegram bot in respective Telegram group
- Send the message received from WhatsApp group to Telegram group
- Now both the groups should be linked and you are all done!
Video Player00:0000:18
Cons of wat-bridge forked bot
- Receiving messages from Telegram to large WhatsApp groups having more than 200 people will crash the bot
- Latest pre contains media support which needs to be documented, for developers I suggest to checkout to previous commits for better results.
sumber : https://ibcomputing.com/category/telegram/ &
http://mcc-mnc.com/
Encrypt & Decrypt
ternyata barang ini masih di perlukan juga
Descript Data AppPool
Berikut perintah untuk mengetahui data list APP Pool ASP.NET
C:\Windows\System32\inetsrv
appcmd list apppool
appcmd list apppool “<TextBOX>” /text:*
Alternatif Command
appcmd list apppool /text:processmodel.username
appcmd list apppool /text:processmodel.password
Mengatasi Remot Desktop Error
Cara mengatasi remot dekstop tidak bisa masuk dengan status di bawah ini,
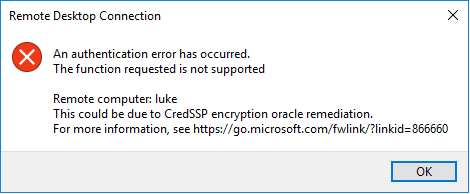
Cara Mengatasinya adalah
- Masuk Command Prompt window dengan akses Administrator.
- jalankan perintah di bawah
REG ADD HKLM\Software\Microsoft\Windows\CurrentVersion\Policies\System\CredSSP\Parameters\ /v AllowEncryptionOracle /t REG_DWORD /d 2 - silahkan di coba login
Install Squid 3.1 Via Webmin dan Limit Access IP | CentOS
CentOS | Squid di port 80 dan limit koneksi ke IP tertentu
Inti dari tutor berikut adalah
- install squid di CentOS 5 32bit
- install squid di CentOS 6 32bit ada 1 perintah tambahan
- install squid di Debian 6 32bit step 6 dan 7 dilewati
- installasi dan konfigurasi full menggunakan webmin
- Squid di install di port 80
- Squid dapat diakses dari sembarang IP
- Squid dibatasi hanya dapat koneksi ke IP tertentu
TUTORIAL BERGAMBAR
1. login ke webmin
2. cari “squid”

3. pilih “Squid Proxy Server”

4. install Squid via Webmin

5. Refresh Modules (dan refresh browser anda)

6. Masuk ke Module “Squid Proxy Server”

7. Bikin cache foldernya
untuk Debian 6 langkah berikut ini di skip /di lewati. Sedangkan untuk CentOs 6, sebelum membuat cache folder, jalankan command berikut diterminal:
sed -i 's/#cache_dir/cache_dir/g' /etc/squid/squid.conf
kemudian kembali ke webmin, klik “initialize Cache“:

8. Kembali ke module “Squid Proxy Server”

9. Masuk ke “Ports and Networking”

10. Ganti Port ke 80 (atau port yang di inginkan) kemudian “Save”

11. Masuk ke “Access Control”
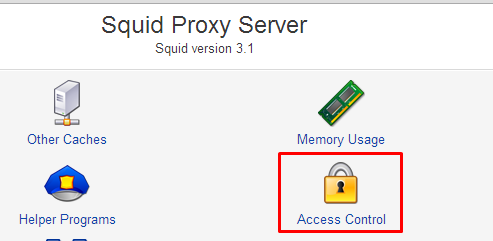
12. Buat ACL baru, pilih yg “Web Server Address”

13. “ACL name” di isi bebas, From IP/To IP di isi IP server VPS anda atau IP ssh anda (kalo beda server),
Netmask isi: 32

14. Pindah ke tab “Proxy restrictions” dan pilih “ Add proxy restriction.”

15. Pilih Allow dan Nama ACL yg sebelumnya telah dibuat

16. Pindahkan ACL name yang sebelumnya dibuat menjadi urutan pertama dan hapus ACL: !Safe_ports dan CONNECT !SSL_ports

17. Jalankan Squid nya

18. kalau start gagal, biasanya ada service httpd yang sudah running, matikan service tersebut terlebih dahulu
service httpd stop
chkconfig httpd off
19. Done
credit to: blog.jualssh; dengan beberapa editing seperlunya termasuk screenshot
Install Squid sebagai Elite / High-Anonymous Proxy pada VPS
CentOS – update file support / dependencies
yum groupinstall "Development Tools" -y
yum install libxml2-devel libcap-devel -y
yum install kernel-devel kernel-headers -y
yum httpd nano -y
yum update -y
untuk debian atau ubuntu
apt-get install build-essential libssl-dev
Install Squid
CentOS
yum install squid -y
Debian atau Ubuntu
apt-get install squid
hapus config aslinya, jangan khawatir karena config defaultnya masih ada dengan nama file squid.conf.def
rm -rf /etc/squid/squid.conf
Kemudian buat file config nya
touch /etc/squid/squid.conf
nano /etc/squid/squid.conf
Konfigurasi untuk versi 3.xx
dns_nameservers 8.8.8.8 8.8.4.4 4.2.2.1 4.2.2.6 198.6.1.3 204.117.214.10 207.172.11.73
dns_defnames on
dns_retransmit_interval 2 seconds
dns_timeout 5 minutes
balance_on_multiple_ip on
cache_mgr not_to_be_disturbed
client_db on
detect_broken_pconn on
half_closed_clients off
httpd_suppress_version_string on
ignore_unknown_nameservers on
pipeline_prefetch on
prefer_direct on
query_icmp on
range_offset_limit -1
retry_on_error on
server_persistent_connections on
strip_query_terms off
uri_whitespace strip

## untuk password untuk versi 32bit, lokasi file ganti seperti di bawah ini :
## /usr/lib/squid/ncsa_auth /etc/squid/squid_passwd
auth_param basic program /usr/lib64/squid/ncsa_auth /etc/squid/squid_passwd
auth_param basic children 5
auth_param basic realm Squid proxy-caching web server
auth_param basic credentialsttl 2 hour
# ACCESS CONTROLS
######################
#Recommended minimum configuration:
acl manager proto cache_object
acl localhost src 127.0.0.1/32 ::1
acl to_localhost dst 127.0.0.0/8 0.0.0.0/32 ::1

# local networks.
acl localnet src 10.0.0.0/8 # RFC1918 possible internal network
acl localnet src 172.16.0.0/12 # RFC1918 possible internal network
acl localnet src 192.168.0.0/16 # RFC1918 possible internal network

acl SSL_ports port 21 22 25 53 109 143 443 554 563 993 21976
acl Safe_ports port 53 80 136 137 182
acl Safe_ports port 22 25 70 210 280
acl Safe_ports port 143 443 554 563 993
acl Safe_ports port 1025-65535
acl Safe_ports port 8000-8090
acl Safe_ports port 67-68
acl Safe_ports port 123 465 488 587 591 777 6667
acl Safe_ports port 9000-9091
acl Safe_ports port 110 119 995 2030 2401 3306 3690 6881 8443 8843
acl ncsa_users proxy_auth REQUIRED
acl CONNECT method CONNECT
#
#Recommended minimum configuration:
######################
## Only allow cachemgr access from localhost
http_access allow manager localhost
http_access deny manager
##
http_access allow localhost
http_access allow ncsa_users
http_access deny to_localhost
http_access deny !Safe_ports
http_access deny CONNECT !SSL_ports
##
## disable multicast icp
miss_access allow all
ident_lookup_access deny all

# NETWORK OPTIONS
######################
http_port 143

# Leave coredumps in the first cache dir
access_log /var/log/squid/access.log
cache_log /var/log/squid/cache.log
cache_access_log none
cache_store_log none
#
hierarchy_stoplist cgi-bin ?
acl apache rep_header Server ^Apache

ipcache_size 8192
ipcache_low 90
ipcache_high 95

#cache_dir null /tmp
cache_mem 16 MB
cache_dir ufs /var/spool/squid/cache0 1000 16 256
cache_dir ufs /var/spool/squid/cache1 1000 16 256
cache_dir ufs /var/spool/squid/cache2 1000 16 256
cache_dir ufs /var/spool/squid/cache3 1000 16 256
deny_info ::0 all

# Add any of your own refresh_pattern entries above these.
refresh_pattern ^ftp: 1440 20% 10080
refresh_pattern ^gopher: 1440 0% 1440
refresh_pattern -i (/cgi-bin/|\?) 0 0% 0
refresh_pattern . 0 20% 4320

visible_hostname google.com
Konfigurasi untuk versi 2.6xx dan 2.7xx
dns_nameservers 8.8.8.8 8.8.4.4 4.2.2.1 4.2.2.6 198.6.1.3 204.117.214.10 207.172.11.73
cache_mgr not_to_be_disturbed
client_db on
detect_broken_pconn on
dns_defnames on
dns_retransmit_interval 2 seconds
dns_timeout 5 minutes
half_closed_clients off
httpd_suppress_version_string on
ignore_unknown_nameservers on
pipeline_prefetch on
prefer_direct on
query_icmp on
range_offset_limit -1
retry_on_error on
server_persistent_connections on
strip_query_terms off
uri_whitespace strip

## untuk password untuk versi 32bit, lokasi file ganti seperti di bawah ini :
## /usr/lib/squid/ncsa_auth /etc/squid/squid_passwd
auth_param basic program /usr/lib64/squid/ncsa_auth /etc/squid/squid_passwd
auth_param basic children 5
auth_param basic realm Squid proxy-caching web server
auth_param basic credentialsttl 2 hour
# ACCESS CONTROLS
######################
#Recommended minimum configuration:
acl all src 0.0.0.0/0.0.0.0
acl manager proto cache_object
acl localhost src 127.0.0.1/255.255.255.255
acl to_localhost dst 127.0.0.0/8

acl SSL_ports port 21 22 25 53 109 143 443 554 563 993 21976
acl Safe_ports port 53 80 136 137 182
acl Safe_ports port 22 25 70 210 280
acl Safe_ports port 143 443 554 563 993
acl Safe_ports port 67-68
acl Safe_ports port 1025-65535
acl Safe_ports port 8000-8090
acl Safe_ports port 123 465 488 587 591 777 6667
acl Safe_ports port 9000-9091
acl Safe_ports port 110 119 995 2030 2401 3306 3690 6881 8443 8843
acl ncsa_users proxy_auth REQUIRED
acl CONNECT method CONNECT
#
#Recommended minimum configuration:
######################
## Only allow cachemgr access from localhost
http_access allow manager localhost
http_access deny manager
##
http_access allow localhost
http_access allow ncsa_users
http_access deny to_localhost
http_access deny !Safe_ports
http_access deny CONNECT !SSL_ports

## disable multicast icp
miss_access allow all
ident_lookup_access deny all
# NETWORK OPTIONS
## open-port ###########
http_port 143
######################
cache_mem 16 MB
cache_dir ufs /var/spool/squid/cache0 1000 16 256
cache_dir ufs /var/spool/squid/cache1 1000 16 256
cache_dir ufs /var/spool/squid/cache2 1000 16 256
cache_dir ufs /var/spool/squid/cache3 1000 16 256

# Leave coredumps in the first cache dir
access_log /var/log/squid/access.log
cache_log  /var/log/squid/cache.log
cache_access_log none
cache_store_log none
#
hierarchy_stoplist cgi-bin ?
acl apache rep_header Server ^Apache

# Add any of your own refresh_pattern entries above these.
refresh_pattern ^ftp: 1440 20% 10080
refresh_pattern ^gopher: 1440 0% 1440
refresh_pattern -i (/cgi-bin/|\?) 0 0% 0
refresh_pattern . 0 20% 4320

visible_hostname Google.com
Setting password
Buat file-nya dulu:
touch /etc/squid/squid_passwd
ubah permission filenya, agar tidak permission denied
chown root.root /etc/squid/squid_passwd
isikan user name dan passwd ke file
htpasswd -b /etc/squid/squid_passwd [user_1] [passwd_1]
Buat cache file dan test jalankan
cd /var/spool
chmod 775 squid
chmod g+w squid
squid -z
squid -d 1 -D
# tekan CTRL+C
service squid restart
start on boot dan start/stop/restart/status squid
chkconfig --add squid
chkconfig squid on
service squid status
all credits: john6000 – bugs4u.info
Solved VPN L2TP
Windows Registry Editor Version 5.00
[HKEY_LOCAL_MACHINE\SYSTEM\CurrentControlSet\services\PolicyAgent]
"AssumeUDPEncapsulationContextOnSendRule"=dword:00000002
The registry change is mentioned in this KB article : http://support.microsoft.com/kb/926179
In case the KB article goes away, the possible values are as following:
- 0 (default): A value of 0 (zero) configures Windows XP SP2 so that it cannot initiate IPsec-secured communications with responders that are located behind network address translators.
- 1: A value of 1 configures Windows XP SP2 so that it can initiate IPsec-secured communications with responders that are located behind network address translators.
- 2: A value of 2 configures Windows XP SP2 so that it can initiate IPsec-secured communications when both the initiators and the responders are behind network address translators.
Cara Buat VPN Google Cloud
- Step 1: wget https: // git.io/vpnsetup
- -O vpnsetup.sh Step 2: nano -w vpnsetup.sh
- Step 3: Replace with your own values:
- YOUR_IPSEC_PSK,
- YOUR_USERNAME
- YOUR_PASSWORD
- Step 4: sudo sh vpnsetup.sh
Good company in a journey makes the way seem shorter. — Izaak Walton
